You’ve managed to bag your deer, now what? Shooting your buck is only the very first step. It certainly doesn’t end there. Newer hunters, and probably a substantial number of those who have been hunting for a while, honestly don’t know what to do next, because they’ve never been shown or taught. Here are some steps and a brief overview on how to process a deer to get you started.
1. Field Dressing
After shooting a deer, the next vital step is to field dress it. It should be noted from the beginning that there is another step that precedes this one: Make sure the buck is dead. That may sound strange but too many people rush out and try to slit the deer’s throat before it is dead and a buck is quite capable of inflicting a lot of damage if it still has any life left in it. Don’t take chances if you aren’t sure – if it shows any signs of life, shoot it again at point blank range. This is far safer and much more humane than the alternative.
Field dressing involves removing the innards and it should be done on the spot, before transporting the deer. When doing this, always use a sharp knife and be very careful not to puncture any of the internal organs. Putting a hole in the guts or bladder can rapidly taint meat and give the venison a strong flavor.
When field dressing, remove as much of the windpipe as you can, as well as the guts, lungs, heart and liver, but if you can help it, don’t cut the throat from the outside. Any remaining windpipe can be removed after the animal is properly hung and the more of the insides that are exposed at this stage, the greater the chance of getting dirt and debris on the meat while it is being dragged to the vehicle or camp. Also, try not to get any more deer hair on the meat than is unavoidable.
This video will show you how it’s done step by step
2. Hanging a Deer

As soon as the deer has been transported to camp or home, it should be hung up. Opinions differ as far as whether it should be hung with the head up or at the bottom, but the important thing is to hang it. This makes it easier to handle, skin it, and it allows the carcass to bleed out. This is the last part of the meat aging process, but it must be remembered that the deer’s heart is no longer circulating blood throughout the body, so hanging it gets an assist from gravity.
Once the deer is hung up so it isn’t touching the ground, cut through the rib cage with a hack saw, parting it as much as you can and prop it open with a piece of 2×4 that has been purposely cut for that purpose, so air can circulate freely.
The next step involves the preliminary ‘thorough rinse’. The inside of the body should be rinsed as well as possible to remove blood, debris and hair that might have found its way inside of the deer. This step also helps to cool the meat if there is any heat remaining in it.
For more information on hanging a deer click here.
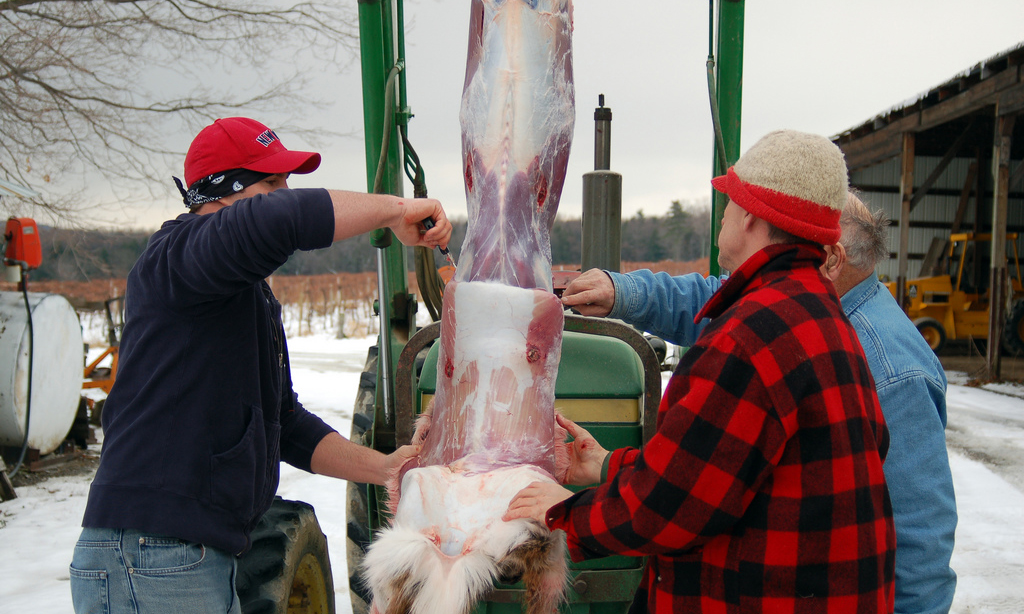
3. Skinning the Venison
While the deer is hanging, there is a perfect opportunity to remove the hide. It should be mentioned again that you should use sharp knives for the best, and safest, results. Again, take care not to get hair in or on the meat, and remove any that you can see.
When skinning, all four feet (from the point usually thought of as the knee – it is actually their ankles) is removed, the tail is removed and the head is usually removed. The hacksaw again comes into play for cutting through bones or joints.
With the hide removed, the carcass should again be rinsed, but more thoroughly than before. At this stage, don’t leave any hair or blood behind if you can help it. These can result in meat that has a stronger and possibly disagreeable flavor.
Some people even soak the meat in water, which is fine if you have access to a large supply of water. It may not be feasible in most cases. Still, this also helps to age the meat faster.
Here is a great video from Realtree.com that demonstrates the skinning process
For more information on how to skin a deer click here.
4. Aging the Deer Meat/Venison
Deer meat should be aged a minimum of three days and to over a week if possible. ‘If possible’ is meant to convey a warning. The meat should be kept at as close to, or below, 40 degrees F as it can be, to prevent spoilage. If the air temperature is well above 40 and there is no way to keep the meat cooler, don’t age it as long.
As a special note, if mold begins to form on the meat, it isn’t a sign of spoilage but rather of excess of moisture. Wipe the meat down with vinegar and pat it as dry as possible, and then make sure that no extra moisture gets to the meat if you can.
For more information on aging venison click here.
5. Cutting and Wrapping Venison
After the aging, the deer is ready for cutting, wrapping and freezing. At this point, you should have a good smelling and clean carcass to work with, though again, be sure that your knives and hacksaw blade are sharp and clean. Definitely clean the hacksaw blade or you’ll probably have bone shards sticking to the meat.
Also don’t be tremendously surprised at the amount of meat the venison yields. A person should figure on about 30% of the weight to be in useable meat. This means that a 200 pound buck will usually yield about 60 pounds of meat after it is cut and wrapped, including a few bones that are left in the meat.
There you have it, the basics of processing a deer after killing it. Specifics belong in more in-depth articles, but this should be enough to point the hunter or would be hunter in the right direction. It is hoped that you will enjoy your feast when it comes. Venison is one of the best tasting and leanest meats that a person can eat, and though that part is opinion, most deer hunters probably wouldn’t disagree.
Image by MotoWebMistress
Related: